Improving startup performance
What is SnapStart?
Typically, AWS Lambda set up a new execution environment each time a function is first invoked or when the function is scaled up to handle increased traffic. The largest contributor to startup latency (often referred to as cold-start time) is the time spent initializing a function. These operations can sometimes take several seconds to complete during the initial invocation. Lambda SnapStart is designed to address the latency variability introduced by one-time initialization code, such as loading module dependencies or frameworks.
How does it work?
the INIT phase for a Lambda function involves downloading the function’s code, starting the runtime and any external dependencies, and running the function’s initialization code. For functions that don’t use SnapStart, this phase occurs each time your application scales up to create a new execution environment. The following image shows a comparison of a Lambda request lifecycle with and without SnapStart.
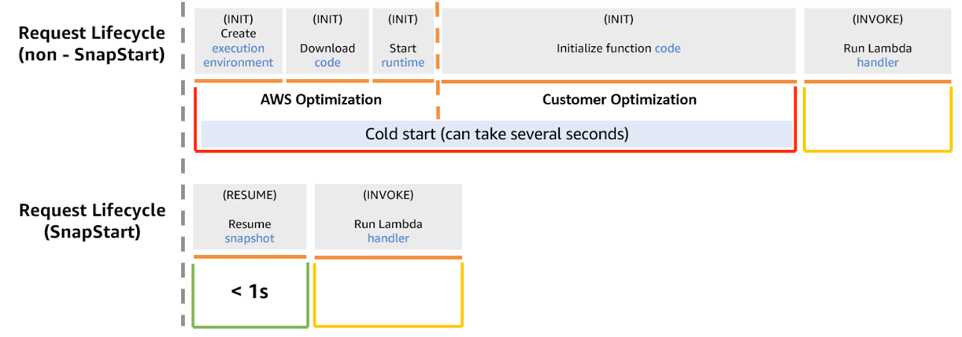
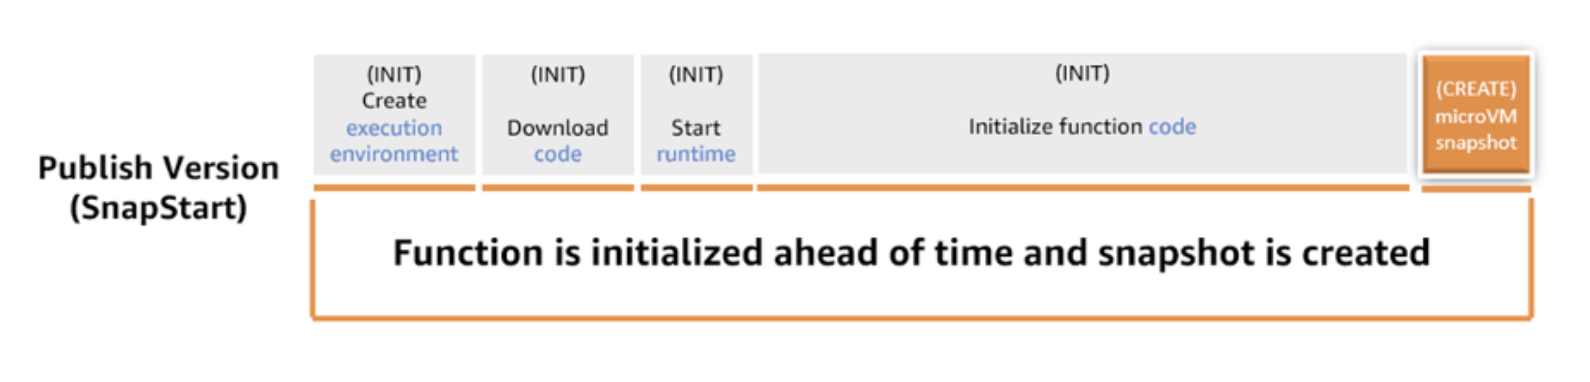
When SnapStart is activated, the INIT phase happens when you publish a function version. At the end of the INIT phase AWS snapshots the memory and disk state of the initialized execution environment, persists the encrypted snapshot, and caches it for low-latency access. When the function is subsequently invoked, new execution environments are resumed from the cached snapshot (during the RESTORE phase), speeding up function startup.
Enabling SnapStart will reduce the startup latency of our sample Spring Boot application.
The AWS construct Cdk4jFunction automatically enables SnapStart so changing the uppercase function in the Stack as follows is all we have to do to improve the performance.
Cdk4jFunction.Builder.create(this, "uppercase")
        .runtime(Runtime.JAVA_25)
        .timeout(Duration.seconds(30))
        .memorySize(512)
        .handler("org.springframework.cloud.function.adapter.aws.FunctionInvoker::handleRequest")
        .code(Code.fromAsset("./target/cdk4j-examples-aws.jar"))
        .environment(
            Map.of(
                "MAIN_CLASS", Cdk4jSpringCloudApplication.class.getName(),
                "spring_cloud_function_definition", UppercaseFunction.UPPERCASE_FUNCTION_NAME
            )
        )
        .build();
You can reduce starts even further for your Spring Boot applications by using priming techniques on Lambda functions. Let’s explore how to implement priming techniques.
Priming
Priming is the process of preloading dependencies and initializing resources during the INIT phase, rather than during the INVOKE phase to further optimize startup performance with SnapStart. This is required because Java frameworks that use dependency injection load classes into memory when these classes are explicitly invoked, which typically happens during Lambda’s INVOKE phase. You can proactively load classes using the PrimingService.
The PrimingService proactive initializes classes during the INIT phase, ensuring that they are included in the function’s snapshot without risking unwanted changes to application state or data. Initialization refers to the JVM process of loading the class definition into memory, verifying the bytecode, preparing static fields with default values, and executing static initializers. This is different from instantiation, which creates objects of the class using constructors.
To generate the list of the classes required for priming, we use the following VM option -Xlog:class+load=info:classes-loaded.txt during the maven build and extracting the fully qualified class names in priming-list.txt.
The dependency org.crac:crac contains the classes required for priming.
Set Memory and CPU Correctly
Memory allocation in Lambda directly affects CPU resources, which in turn impacts cold start times. Increasing memory provides more CPU power, often leading to faster initialization. Tools like AWS Lambda Power Tuning can help you find the best balance between performance and cost. Adjusting memory settings thoughtfully can make a noticeable difference without significantly inflating your expenses.
AOT
Traditionally, Spring performs heavy lifting at startup—like scanning your classpath for beans, processing annotations, and resolving dependencies—using reflection. Spring AOT moves these tasks to the build phase, generating optimized bytecode and metadata so the application “remembers” its configuration rather than having to figure it out every time it starts.
To build a AOT enabled Spring appliction we have to include an <execution> block for the process-aot goal within the spring-boot-maven-plugin configuration
<plugin>
  <groupId>org.springframework.boot</groupId>
  <artifactId>spring-boot-maven-plugin</artifactId>
  <executions>
    <execution>
      <!-- analyzes your application at build-time and generate an optimized version of it -->
      <id>process-aot</id>
      <goals>
        <goal>process-aot</goal>
      </goals>
    </execution>
  </executions>
</plugin>
To actually use these AOT optimizations when running on a standard JVM (without a native image), you must set the spring_aot_enabled environment variable to true in the function construct.
Cdk4jFunction.Builder.create(this, "uppercase")
    .runtime(Runtime.JAVA_25)
    .timeout(Duration.seconds(30))
    .memorySize(256)
    .handler("org.springframework.cloud.function.adapter.aws.FunctionInvoker::handleRequest")
    .code(Code.fromAsset("./target/cdk4j-examples-aws.jar"))
    .environment(
        Map.of(
            "MAIN_CLASS", Cdk4jSpringCloudApplication.class.getName(),
            "spring_cloud_function_definition", UppercaseFunction.UPPERCASE_FUNCTION_NAME,
            "spring_aot_enabled", "true"
        )
    )
    .build();